
Halloween DIY: Globster Plush Stuffed Toy!

What, you may ask, is a Globster? Well, one might say it's a mythical sea monster, a relative of the classic horror beast, The Blob. Or, if you're familiar with the amazing picture book Halloween Good Night, you'll learn that a Globster is: epically cute, squishably cuddly, not the slightest bit frightening, and every preschooler's new must-have bedtime friend!

In fact, as I was sewing the Globster prototypes, my five-year-old, two-year-old, and twelve and thirteen-year-olds called dibs. I'm pretty sure the five-year-old won out because who can say no to the girl who calls it, "My Lobster!" However, the battle is still ongoing. I see more sewing in my future.
Let's get to it, then! I designed this Globster to look just like Ella Okstad's so-adorable-I-can't-stand-it illustration, and after some hiccups, I think I got the pattern just right. Just follow the easy-peasy tutorial below, and in about an hour, you can enjoy your very own Globster!
How to Sew a Globster Stuffie
First, you will need the pattern. Download the PDF Globster Pattern, which will make the smaller blue Globster. For a larger version (my prototype used in the how-to photos below), enlarge all sides except the arm's long sides by a half-inch or so.
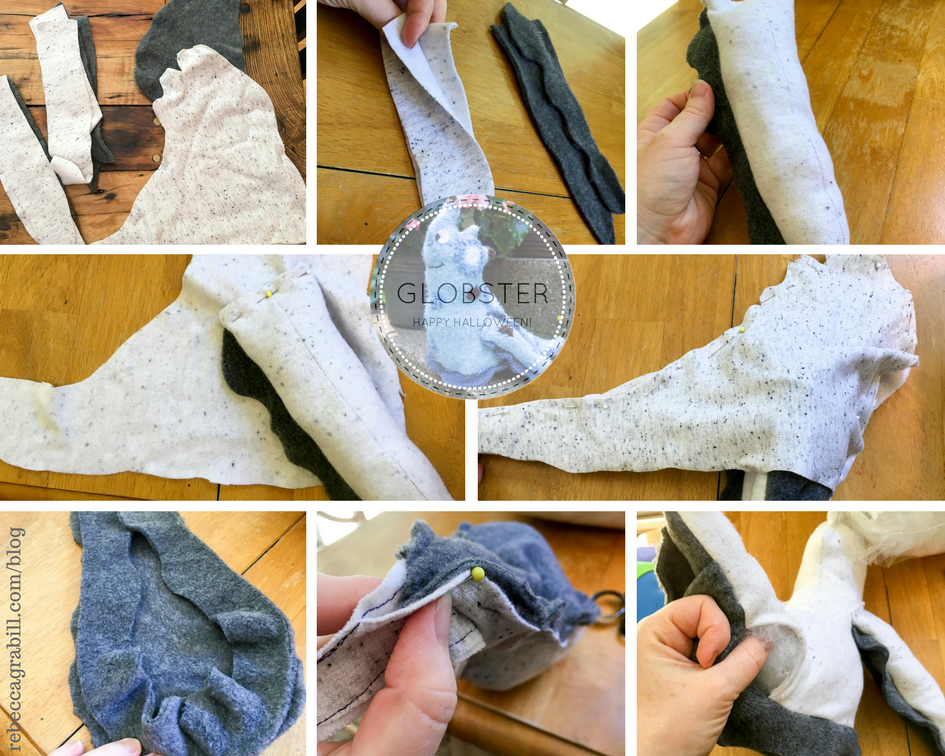
First step, cut out the pattern pieces. I'm assuming if you're tackling this craft, you're not new to patterns or sewing, but in case it needs saying: One side of the Globster body should be the reverse of the other, same with the arms.
Next, assemble the arms. Stitch the curved seam (wrong sides together) first. Then attach one side to the arm base, being sure the tentacle ruffle is facing into the middle so when it's turned right-side-out there will be a nice ruffly edge. Repeat on the other side. NOTE: my prototype has only one tentacle ruffle, but the pattern calls for two. You pick! I like it best with two.
Turn the arms right-side-out and stuff with whatever stuffing you like. I used poly fiber fill for the prototype, and poly beads with a little fluff at the top for the small, blue Globster. Turn the edge over and pin the arm to the body as shown on the pattern. On the prototype I put the arms in more of an "arm" position. On the blue one, lower and angled differently. I like both. Stitch. I strongly suggest running two lines of stitching a bit apart for durability.
Now pin the arm-attached-bodies wrong sides together. My first go I stitched all around and had to turn and stuff through the base. This was a pain. Learn from my mistake and leave an opening large enough for turning in the Globster's back. Like this.

SO Easy
And helpers are helpful, too!
Of course you haven't sewn the bottom on yet, so the image above is a little "beyond" - but you get the idea, yes? Good. Next up, pin the base to the body, with the ruffle facing inward as with the arms. It's a little tricky to keep it all lined up but oh-so cute when you're done!
Next stitch the base to the body. If you left a gap for turning along the Globster's back, just close it up all the way. If not, leave an opening for turning and stuffing. One tricky spot: the tail is longer than the body. You may have to stitch that together partway first, then stitch around the base.
Finally, turn that cutie right-side-out and stuff! I put beads in the base to give some substance, then filled with fiberfill. Whip-stitch the opening closed and BOOM! Globster time!
OH! Almost forgot. Eyes. Mouth. With both I embroidered a little smile on the face. With the prototype I sewed on button eyes, which I found creepy. Second time, I glued on white felt circles then embroidered the pupils. Whatever your style demands!
I am by no means a master seamstress. Or even a very good one. I mostly rip seams out and mutter naughty words. So if I can make a Globster, anybody can!
I'd love to see your projects! Tag #halloweengoodnight on instagram, or email me.

And OF COURSE read the book Halloween Good Night while having lots of Globstery bedtime cuddles!


Whether for cuteness or story, enjoy the free wallpapers I’ve created featuring some of Ella’s images. And while you’re at it, why not read the book!